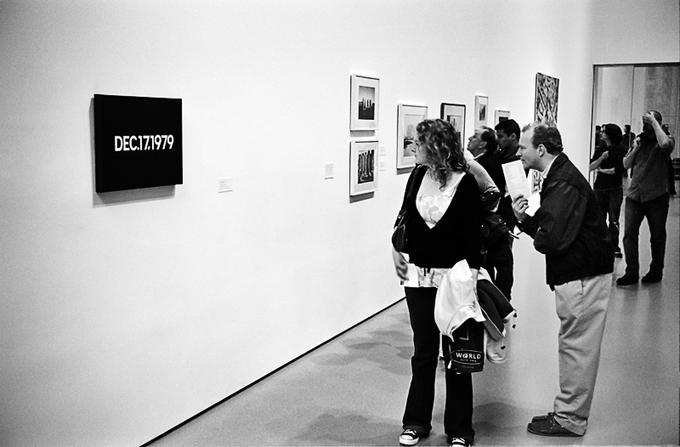
Viewers looking at a painting from On Kawara's "Today Series."
As someone deeply invested in the art world, chances are you’ve found yourself playing art-guide to your friends or relatives on trips to the museum. And chances are, your friends or relatives will consistently praise the old Renaissance paintings, while drawing blank stares at anything modern. “What’s the big deal, I could do that?!”
The issue here, for some reason, is a matter of old-fashioned skill and labor (or lack thereof). Take On Kawara’s Today Series. At first glance, your friends or relatives will inevitably dismiss them (“why would anyone do that?”), but when you explain that Kawara painted the dates by hand without using a stencil they are immediately impressed. “Without a stencil?”
The artist’s labor has always been a precarious currency in the art market; occasionally exchanged for monies, other times for less tangible payments like publicity, access-to-networks or rare experiences. While there are always exceptions to any rule, the amount of labor expended has traditionally remained a mathematical measure of validity for the art objects that result.
In the age of automation, software tools, and outsourced development, how can any digital artist expect to be taken seriously, if the “labor” expended is a matter of keeping up a Tumblr blog or printing out and blowing up Photoshop gradients? Is there some kind of heroic equivalent to making digital images from scratch, “by hand” and “without stencils?” Look no further! In this tutorial we will be showing you how to create a Bitmap Image File (.bmp). A .bmp file, like any image file, is a matrix of pixels sized a particular width by a particular height. We will be creating our .bmp from scratch, by typing in machine code bit by bit. When one hears the term “machine code,” binary-code is likely the first thing that comes to mind. For this tutorial, however, we’ll be working in Hexadecimal. In order to write in Hex code you’ll need a hex editor. You can download Hex Fiend, a free and open source hex editor for MAC, here. (NOTE: Call us crazy, but we’re assuming you’re a MAC user. Don’t worry, the same principles apply to all platforms).
//Hexadecimal Numbers
Hexadecimal is base 16, this means it is a numerical system which uses 16 characters, 0 through 9 and A through F. We’ve put together a chart for you to use as a “cheat-sheet” until you get used to writing in hex.

If you were to continue adding to this chart, decimal 16 would be hexadecimal 10, 17 would be 11, 18 would be 12 and if we jumped a bit further, 26 would be hexadecimal 1A, 27 would be 1B, 28 would be 1C and so on. We’ll be converting larger numbers into hex a bit later on in this tutorial, when we set our .bmp’s width and height.
//Hexadecimal Colors
Now that we understand how regular numbers translate to hex we’ll take a look at colors. If you are a web developer or you use Photoshop you might already be familiar with hex color values. You might already know that FFFFFF translates to white and 000000 to black, but why? It’s actually very simple: each pixel in a .bmp has a red value, a blue value and a green value. These values can range from 0 to 255, which is 00 – FF in hexadecimal. A pixel contains 6 characters, or three sets of two, one set for each value R, G and B. So if I wanted to make a pixel red, I would type FF0000, setting my red value to the max of FF while maintaining my green and blue values at 00.
//File Header
Now that we understand the basics of Hexadecimal numbers and colors we can start a small sketch. Every .bmp file contains two sections, the file’s header followed by the image data. The header is the first couple of lines of code which contains the file’s basic information (what kind of file it is, what its dimensions are, etc.)
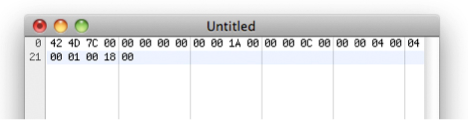
Lets go ahead and open up Hex Fiend. Before we start constructing our header we should make some changes to Hex Fiend’s set-up to make it a bit clearer. Select the Views tab in the Menu. Then un-check Plain Text (this can get distracting), then at the button where it says Byte Grouping select None. Now we can start creating our header. The first thing we’ll need is some basic .bmp info, type the following code into your file:
42 4D 4C 00 00 00 00 00 00 00 1A 00 00 00 0C 00 00 00
Next we’ll need to set our .bmp’s dimensions. We’ll keep it small for this first sketch, lets make our width four pixels wide:
04 00
Lets also set our height to four pixels:
04 00
Last, we’ll type in some more standard .bmp header code:
01 00 18 00
We’ve now finished setting up our header, if you did this right it should look like the image below:
//Image Data
Here’s where we start typing our pixels. Usually .bmp files read from right to left and bottom to top, which is the exact opposite of the way we read words on a page and can get confusing! The particular kind of .bmp we set up in this file will also read bottom to top, but will read left to right instead of right to left, which will make things a bit easier for us. So the first pixel we type will be showing up on the bottom left hand corner of our .bmp image and the last pixel will show up on the top right hand corner. As if things weren’t backwards enough, we’ll also be writing our color values backwards, this mean B-G-R rather than R-G-B.
Once we’ve wrapped our heads around that, we can start typing our first row (i.e. bottom row). Lets set it up to alternate between red and white pixels. First I’ll type my red pixel:
00 00 FF
Next we’ll type our white pixel:
FF FF FF
Because we set up our .bmp to be 4px wide, we still need two more pixels to finish off our first row; let’s type one more red pixel and one more white pixel:
00 00 FF FF FF FF
That should finish off our bottom row. For the next row we’ll alternate between white and black pixels. First we’ll type out a white pixel, then a black one, then white again, then black again:
FF FF FF 00 00 00 FF FF FF 00 00 00
For the next row we’ll alternate between blue and white:
FF 00 00 FF FF FF FF 00 00 FF FF FF
And for the last row (which visually will be our first row), we’ll alternate between white and black again:
FF FF FF 00 00 00 FF FF FF 00 00 00
At this point we’ve typed out four rows, each four pixels wide. We can’t type any more pixels because we only set our image dimensions to 4×4 pixels. The last thing we need to finish off our file is a little padding. Type in four zeroes and you’re finished:
00 00
Now save your file as sketch.bmp and open it up in Preview. It should look like the image below:
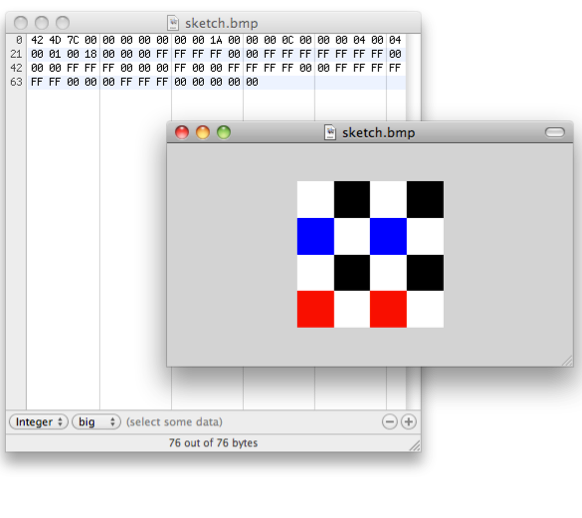
Remember, the .bmp file you just created is only 4px wide by 4px high. This means when you open it up in Preview you’ll have to zoom in a bit before you can see your pixels. If your image doesn’t look like the one above you likely mistyped some code. Take a close look at the image above and check your file line by line.
//Creating Larger Compositions
It was easy to set up our file with a width and height of four pixels because the decimal “4” translates to the hexadecimal “4.” If we had set up a larger .bmp, say 13px by 13px, our header would have looked like this:
42 4D 7C 00 00 00 00 00 00 00 1A 00 00 00 0C 00 00 00 0D 00 0D 00 01 00 18 00
Notice that the section in our header which contains the width and height are set to hexadecimal “0D” where it used to say “04”; this is because (as our chart demonstrates above) 13 translates to “D” in hex code. But what if we want to set up an image that’s much larger, say for example 268px by 268px? Rather than counting all the way to 268 in hex, there’s a formula we can use to convert the decimal 268 into hexadecimal. This is going to involve some long division so we might want to take out a pencil and paper. We start by dividing 268 by 16 (because hex is base 16):
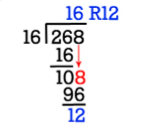
(268/16 = 16 R12)
We get 16 with a remainder of 12. The remainder will be our first value, we’ll convert it to hex (“C”) and save it for later. Next we’ll take the answer without the remainder (which was 16) and now divide that by 16 like we did before: (16/16 = 1 R0). Just like before, the remainder becomes our next hex value (“0”), which we’ll save for later. We’ll take the answer from this last problem and divide that again by 16 (1/16 = 0 R1). Now that our answer reached zero we’ve got our last remainder (“1”).
Now we write our remainders from last to first: “1”, “0” and “C” or 10C which is hex code for 268.
Now that we’ve got our hex code, there’s a bit more reordering we need to do before we can stick it in our header.
First we need to split our hex value 10C into pairs starting from the right: 1 0C (we’ll change the “1” to a “01” in order to make it a pair): 01 0C Now that we’ve organized our hex value into pairs the last thing we need to do before including it in our header is flip the pairs:
0C 01
And because we want both our width and height to be 268, we’ll type in this value twice into the dimensions portion of our header. Our new header should look like this:
42 4D 7C 00 00 00 00 00 00 00 1A 00 00 00 0C 00 00 00 0C 01 0C 01 01 00 18 00
That wasn’t so hard! You may have noticed that for both sketches we’ve chosen a multiple of 4 for my dimensions. This is because any .bmp’s with dimensions that aren’t a multiple of 4 need to have padding added after each row in the image data. So say we set up a sketch that was 18px by 18px. We would need to divide 18 by 4, which is 4 with a remainder of 2. We then take our remainder (2) and add that many 0’s as padding at the end of each row. To avoid having to type in extra padding, we’ll be sticking to multiples of 4 in this tutorial.
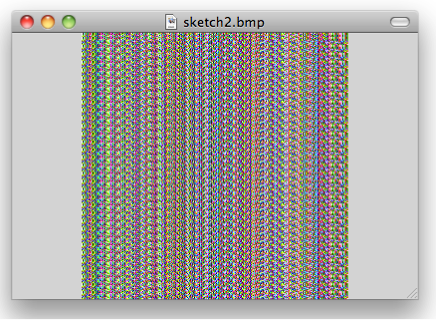
Now that we’ve created my header for a .bmp with a width of 268 and height of 268, it’s time to start typing out some image data. A .bmp with a dimension of 268px by 268px will have 71,824 pixels in it. Each pixel contains 6 characters (white = FF FF FF), which means our new sketch will have a total of 430,944 characters following the header info. After you type out all 430, 944 hex characters, remember to close your sketch with a padding of four zeroes at the very end like before.
It’s very important that your image data contain all 430,944 characters as required by the dimension we’ve set. If your file is missing or has added even one character your .bmp won’t work. Check out this sample 268px by 268px sketch below. We did a lot of copying and pasting in order to reach all 430,944 characters. This is really only a taste of the intricate color patterns you can achieve with a hand-crafted bitmap!


Pingback: How To Create A Bitmap Image File By Hand, Without Stencils | Art21 Blog | ART 209 | Digital Media